Kali Linux is an open source project that is maintained and funded by Offensive Security, a provider of world-class information security training and penetration testing services. In addition to Kali Linux, Offensive Security also maintains the Exploit Database and the free online course, Metasploit Unleashed.
https://www.kali.org/about-us/
They are really working hard to get you. They can spoof access points. They can Man in the Middle and grab your data. They can even spoof login pages to grab your credentials.
Wireshark is the world’s foremost and widely-used network protocol analyzer. It lets you see what’s happening on your network at a microscopic level and is the de facto (and often de jure) standard across many commercial and non-profit enterprises, government agencies, and educational institutions.
Cain and able
Cain & Abel is a password recovery tool for Microsoft Operating Systems. It allows easy recovery of various kind of passwords by sniffing the network …
The net user command is a very useful tool. The instructions were confusing. when they say to type /domain, they mean it. not your domain or the users. the actual word domain.
Here is a cross browser solution to allow the user to press a button and print out the contents of an element. Suppose we have a content area with an id of “mycontentarea”, and a button that says “print”. We can attach a handler to the click event and run this code in the function to print out the contents of “mycontentarea”:
As complex paperless forms become full fledged web applications, there is a growing need for automation such as having a form available to be used from a certain date/time range. For example, a health insurance sign up that opens on December 1 at 9:00 AM and closes on December 24th at 5:00pm Pacific Time. We want these times to be hard coded for the server, in case the users are from different time zones, we want everyone to be able to sign up at exactly the same server time, regardless of their location. So if they were from New York, they would be open to sign up at 3pm December 1st, etc….
We need a few variables. open_date – the date / time that the form will open close_date – the date / time that the form will close today_date_server – the current date/time of the servertoday_date_user – the current date/time of the users machine. user_time_difference – the difference between the users time and the servers time. this could be used to display correct messages about when the user can sign up.
openorclosed – this will be set by the logic then used to display the correct messages and ui views closedmessage – this will be a spot for the special message that will display to the user when the form is closed.
So now that I have my variables set up, lets put them to use. I will compare the dates and make sure that today is within the form opening range. Then I will set the openorclosed variable to open or closed based on the results. The I will update the ui view according to the openorclosed variable.
Here is the final form opening and closing automation logic in VbScript:
open_date = "9/2/" & year(NOW) & " 09:00 AM"

close_date = "10/14/" & year(NOW) & " 05:00 PM"

today_date_server = NOW()

datediffopen = DateDiff("n",today_date_server, open_date)

datediffclosed = DateDiff("n", today_date_server, close_date)

If datediffopen < 0 and datediffclosed > 0 Then

openorclosed = "open"

Else

openorclosed = "closed"

End If
This will automatically open and close the form to the users every year. Hooray for Automation!
Now I can manipulate the ui view using the variables, so the user will know when the form is open and why its closed.
[code language=”vb”]
If datediffopen > 0 and datediffclosed > 0 Then
‘display message for before the form has opened for the year.
openorclosedmessage=”The nomination form will be open from ” & open_date & ” to ” & close_date & “. Please submit your nominations between this time period for them to be considered.”
ElseIf datediffopen < 0 and datediffclosed < 0 Then
‘display message for after form has closed for the year.
openorclosedmessage=”The nominations were due by ” & close_date & “. The nominations are over for the ” & year(NOW) & ” year. The nomination form is closed.”
End If[/code]
To display the date and time in a user friendly format – Tuesday, October 14, 2014 at 5:00:00 PM – use the FormatDateTime function: [code language=”vb”]FormatDateTime(close_date, 1) at FormatDateTime(close_date, 3)[/code]
To debug the automation code, use this snippet:
[code language=”vb”]
‘ this message is for de bugging the open / close automation
closedmessage = closedmessage + “<p class=’redtext boldtext’>Today is ” & today_date_server & “. The form will open on ” & open_date & ” and close on ” & close_date & “. Is today inside the date range?” & isitopenorclose & “. The date dif open is ” & datediffopen & “. the date diff closed is ” & datediffclosed & “</p>”
[/code]
Now I would like to take this a bit further, by having the form open on the first Monday of January, and close on the last Friday of January. Here is the algorithm I have come up with:
[code]
mydate = “1/1/” & year(NOW) & ” 9:00 AM”
dtmDate = CDate(mydate)
daycounter = 1
Do While daycounter <= 7
‘ response.write(Weekday(dtmDate) & ” is the weekday for ” & dtmDate & “<br/>”)
If Weekday(dtmDate) = 2 Then
response.write(“<br>The form will open on ” & FormatDateTime(dtmDate, 1))
Exit Do
End If
daycounter = daycounter + 1
dtmDate = dtmDate + 1
Loop
daycounter = 1
Do While daycounter <= 31
‘response.write(“<br />” & Weekday(dtmDate) & ” is the weekday for ” & dtmDate & “<br/>”)
If Weekday(dtmDate) = 6 Then
thelastfriday=dtmDate
End If
daycounter = daycounter + 1
dtmDate = dtmDate + 1
Loop
response.write(“<br>The form will close on ” & FormatDateTime(thelastfriday, 1))
[/code]
For the year 2014, the result will display: The form will open on Monday, January 06, 2014 The form will close on Friday, January 31, 2014
Now I can drop this into my forms that will open in the pattern of first Monday, and close on last Friday of January.
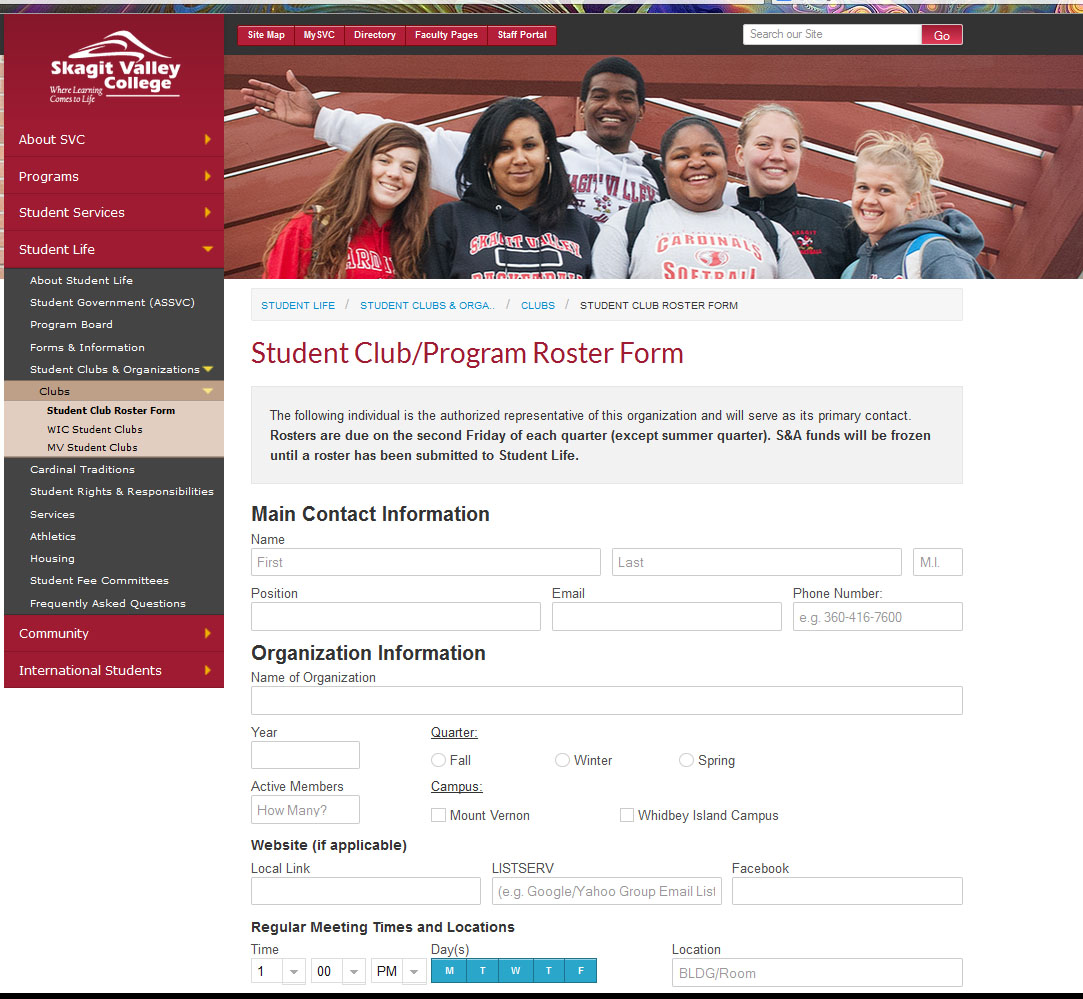
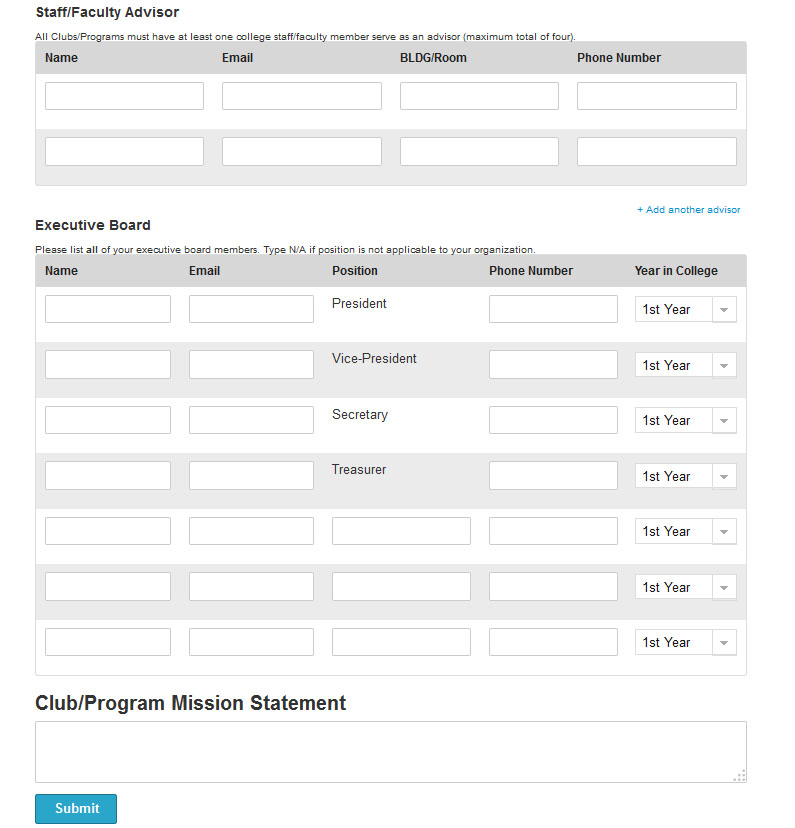
I was assigned the task of turning the Student Club Roster Form paperwork into a paperless web application. This was a challenging project involving a lot of dynamic elements and on the fly data validation.
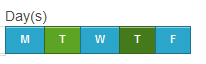
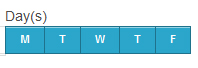
I created a day of the week chooser to hide some intrusive and unintuitive form checkboxes and turn it into a slick ui with a responsive modern design.
See this post for more information about the day of the week chooser.
The head of the I.T. Department at Skagit Valley College asked me to convert the paper form that was used for submitting an I.T. Project Request. I used my 3DW DevCloud Tools to whip out this project in a small amount of time. My project management cloud is the perfect way to track and complete this project. As you can see from the tabs in the screen shot, I’m logged into my DevCloud, and have my task lists, notes and planning documents right at my fingertips. These powerful tools allow me to compete projects quickly and efficiently, using the best practices and techniques I have honed through the years of web application development at Skagit Valley College.
I have come up with a technique to allow the user to edit content “Inline”.
Lets look at an example. I have a table of data, and the user needs to be able to edit the “Description” Field. Rather than take the user away from this ui view, I wish to enable “Inline Editing” like many powerful applications are offering these days.
The first step is to assign functions to the correct fields and capture the users input events. The user would click on the field to select it, so lets set up a doc delegate event to capture a click on the description field. We need to use doc delegate because the data is dynamic and so isn’t in the DOM when the events handlers are normally assigned. Read my post about JQuery Document Delegate to catch up on this technique. I am going to delegate the capture of a click event on any table row <tr> with a class of “editBannerDescription”
$("#bannerslist").on("click", ".editBannerDescription", function(e){
var thedata=$(this).html();
alert(thedata);
 });
Yeah boyeee we have captured a click event for any element in the bannerslist table, and have access to the content that is in the table cell.
The next step is to alter the ui view so the user can edit the contents of the description table cell. I use a JQuery / JavaScript function to accomplish this:
enableEditDescription(object, bannernid){
     console.log("Message from enable Edit Description function: lets
enable to edit the description of slide id:"+bannernid+" from
description of : "+$("#"+object).html()); }
I will continue to modify the enableEditDescription function to alter the ui view when the user clicks. I will grab the content from the cell, and replace the content with a text area whose value is the text that was in the cell.
The final code looks like this:
$("#bannerslist").on("click", ".editBannerDescription" , function(e){
var thedata=$(this).html();
var object=$(this).attr("id");
var getbannernid = object.match(/d+$/);
if(getbannernid){
    bannernid=parseInt(getbannernid[0], 10);
    console.log("Message from banner admin inc, here in doc delegate for
     editBannerDescription with content of :"+thedata+" in cell
     object id: "+object+" for banner nid: "+bannernid);
     enableEditDescription(object, bannernid);}
else{ alert('error getting id');}
 }); // end #bannerslist doc delegate actions
Now, when the user clicks a table cell with editable content, the cell changes into an inline editor.
The user needs to be able to “escape out” of the edit mode, discarding any changes that were made in the field.
Lets start with capturing the escape key press event when the user is in an editing field. We’ll use the good ol doc delegate to capture this as so…
$("body").on("keydown", "textarea, input", function(e){
if(e.keyCode==27){
console.log("We have key press of escape key, on event target " + e.target.id +
" lets exit edit mode without saving changes. Lets decide what place they're editing...");}
}); // end on keydown event handler
Now I can put back the original content of the cell and the user will have “escaped out” of edit mode.
The next step is going to be really fun. We are going to capture the press of the “Edit” button and save the new content into our cms.