Working in Unity with Visual Studio Integration Development Environment
In this Unity learning challenge I put my User Interface skills to the test with this whack-a-mole-like challenge in which you have to get all the food that pops up on a grid while avoiding the skulls. I was required to debug buttons, mouse clicks, score tracking, restart sequences, and difficulty setting to get to the bottom of this one. I tested the application, made a log of any errors/bugs in the code and gameplay. Using C# scripting and utilizing various Unity APIs, I completed the debugging, diagnosing and fixing code that compiles but fails to perform as expected.
Challenge Outcome:
All of the buttons look nice with their text properly aligned
When you select a difficulty, the spawn rate changes accordingly
When you click a food, it is destroyed and the score is updated in the top-left
When you lose the game, a restart button appears that lets you play again
I have a wide variety of Metaverse scripting skills, as well as 3D sculpting, modeling and design. Please check out the samples.
I have certifications in 3D sculpting, modeling and animation using 3D Studio Max. I also have skills using Unity, Blender, True Space 3D, Maya, Poser and Bryce
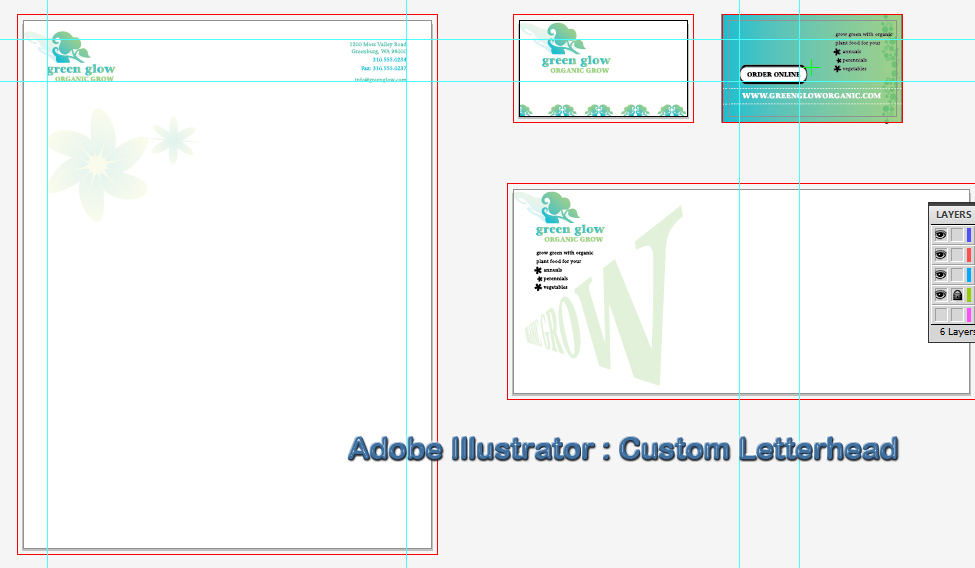
For my final project in Adobe Illustrator class, I decided to show off my creative side, and design some clothes. I look forward to designing and releasing a line someday.
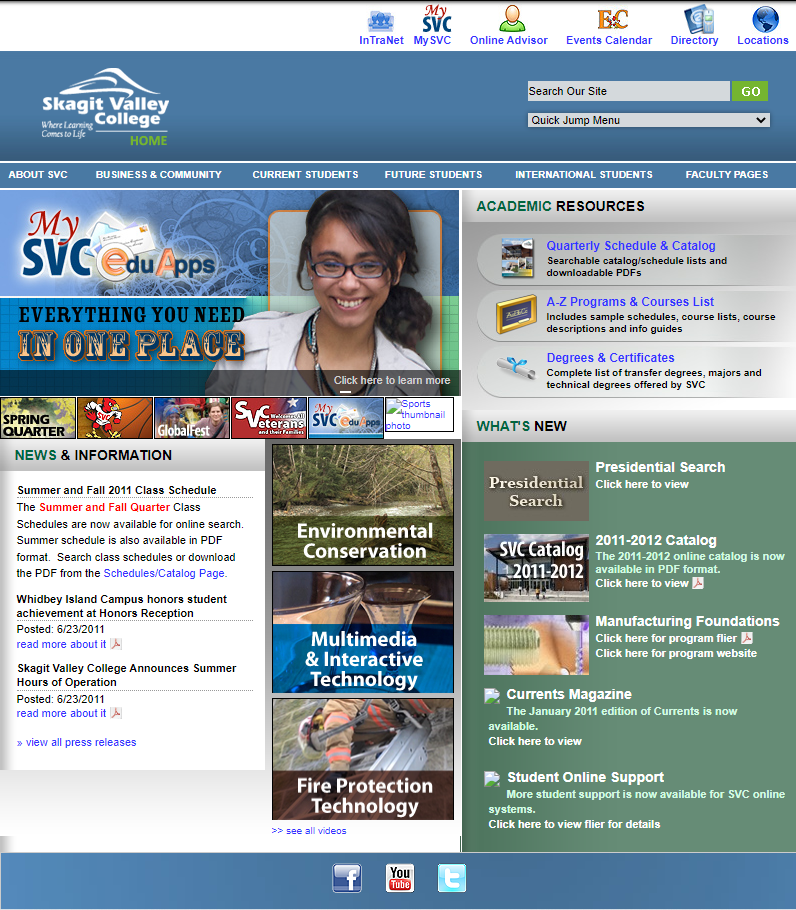
The IT team that is quietly powering the entire Skagit Valley College information infrastructure is a talented team of Technology Specialists. This diverse group of enthusiastic developers has helped redefine the way technology is used and have dramatically impacted the future of web development. We were laughing about how small the website looked in the screens of the new large monitors. I mentioned hearing about a flexible website layout that would allow to better use the screen space. My leaders asked me to put together some information about the subject.
I began with the initial research of web frameworks and responsive web technology, and then I presented my findings to the web team. From there we decided to go with a responsive web site rather than creating a separate mobile site. The technology that we have put in to place can now detect a user’s screen size, and then “respond” by changing the web page to best fit the user’s devices from PC to smart TV to iPhones and beyond.
The previous site was built at a fixed size for the monitors of the day.
Skagit Valley College website 2011
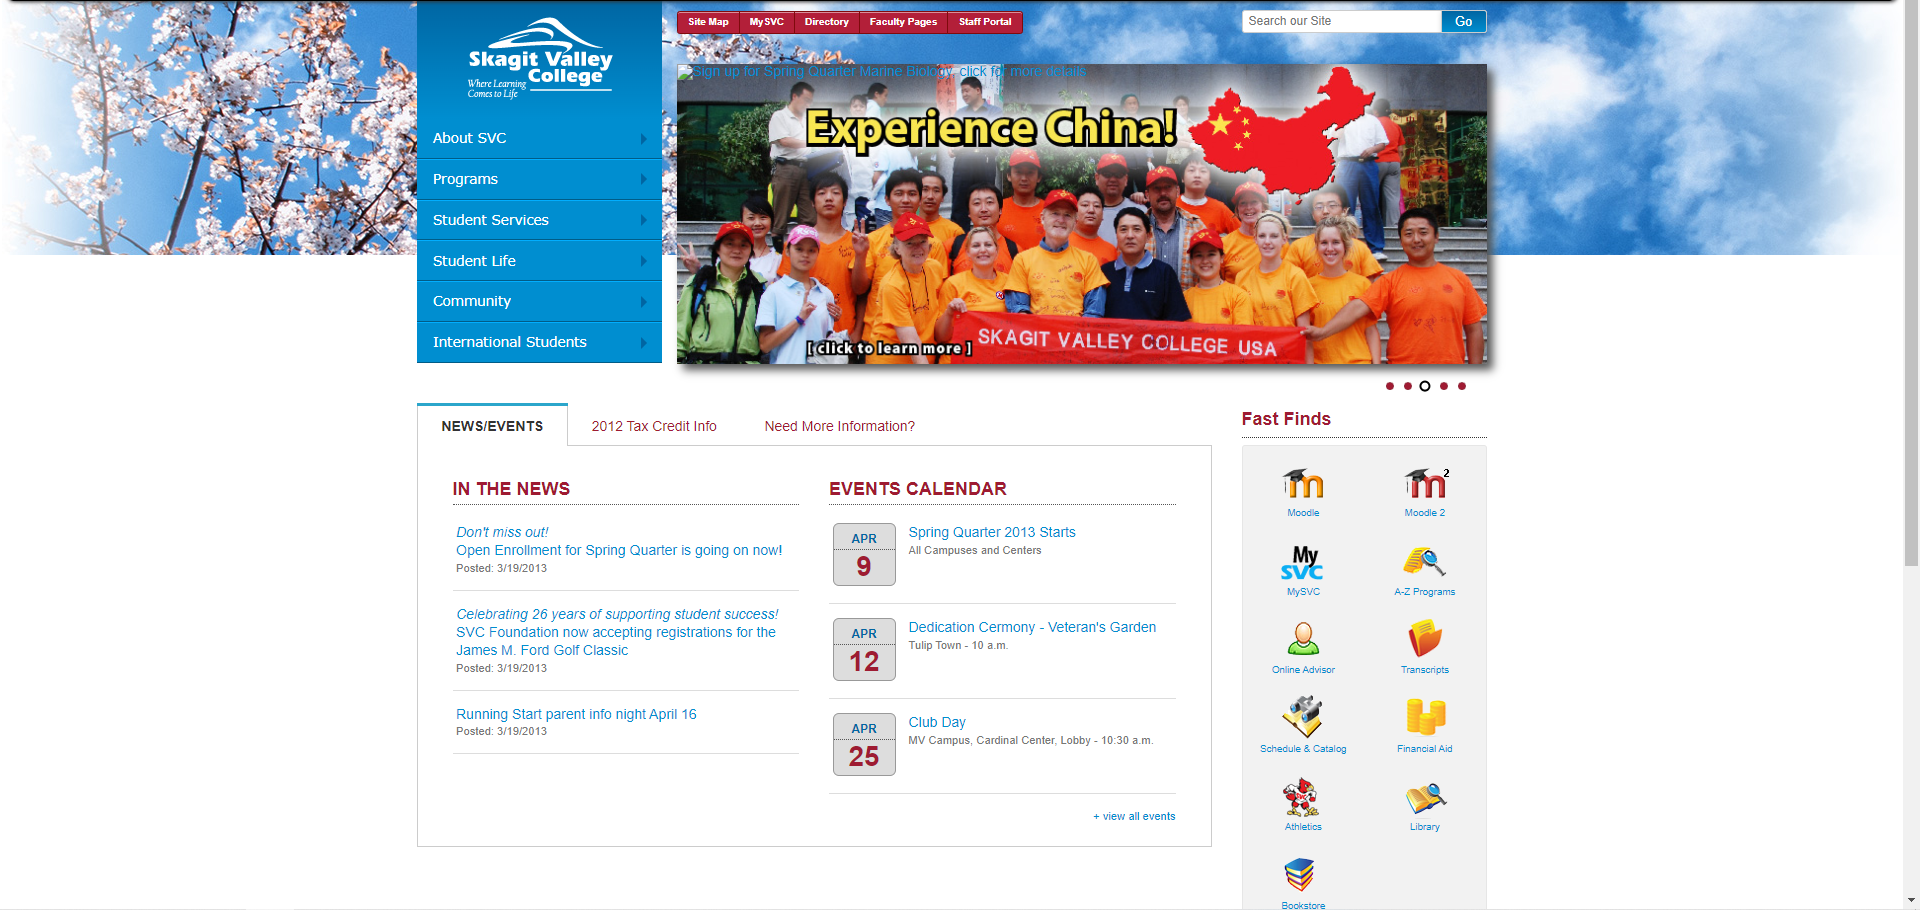
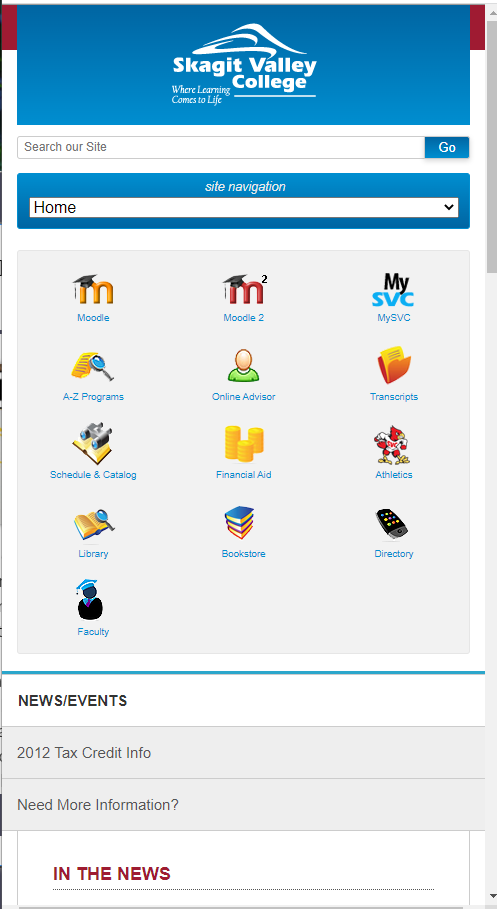
The new design looked great on desktop computers as well as mobile devices.
Skagit Valley College website 2014SVC website in responsive mode on mobile device
This is an awesome resource to create the various Icons for your project. From the browser “Favicon” to the home screens of windows, Android and Apple devices, this will create the perfect sizes and filetypes.
We create a helper class to use. This will return a variable that is set to the correct type. Credits to Steam Webhosting!
 public static class AppSettingsHelper
    {
        public static T GetValue<T>(string key, T defaultValue)
        {
            var value = ConfigurationManager.AppSettings[key];

            if (string.IsNullOrEmpty(value))
                return defaultValue;

            return (T)Convert.ChangeType(value, typeof(T));
        }
    }
We use the helper function to get the value and set the types of the variables.
        // debug / test settings
        static readonly bool testmode       = AppSettingsHelper.GetValue<bool>("TestMode", false); // toggle test mode
        static readonly bool disableupload  = AppSettingsHelper.GetValue<bool>("DisableUpload", false); // disables the upload to server if true

        // sftp settings
        static readonly int port            = AppSettingsHelper.GetValue<int>("SFTPPort", 22);
        static readonly string host         = AppSettingsHelper.GetValue<string>("SFTPHost", "feeds.dwdenney.com");
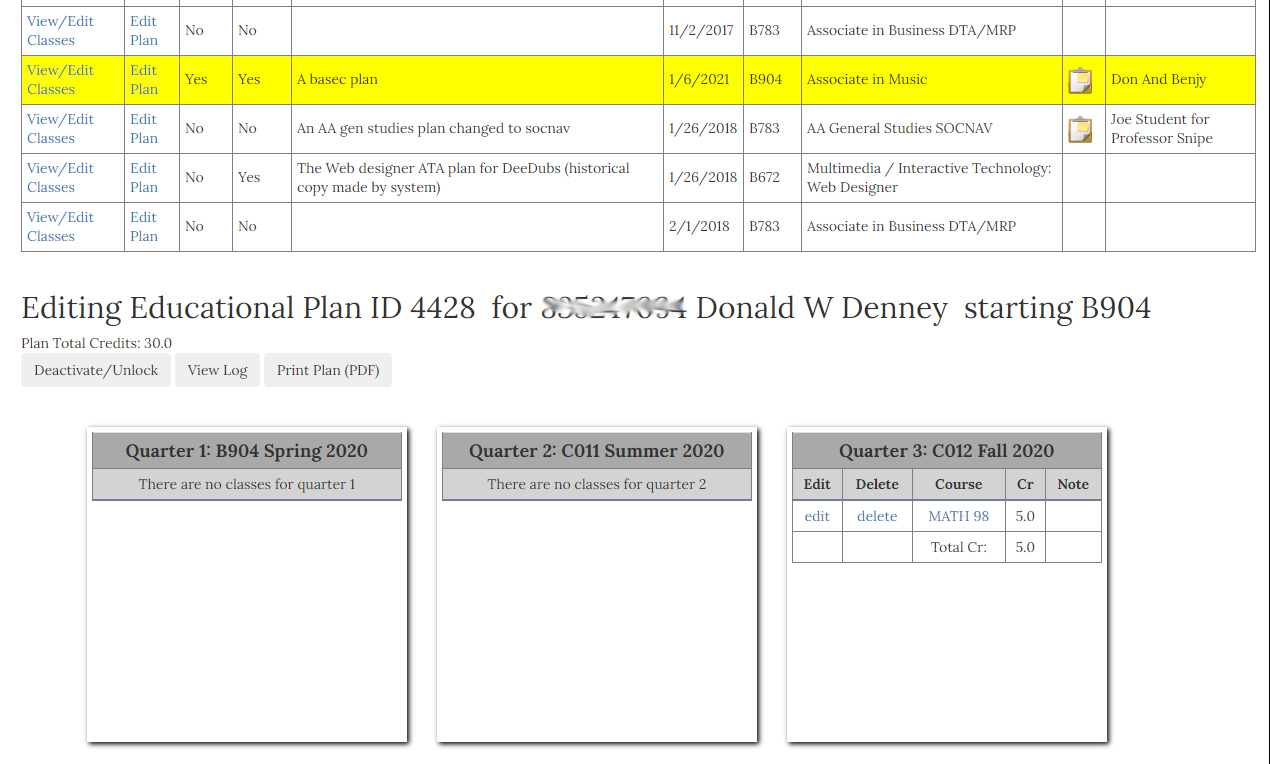
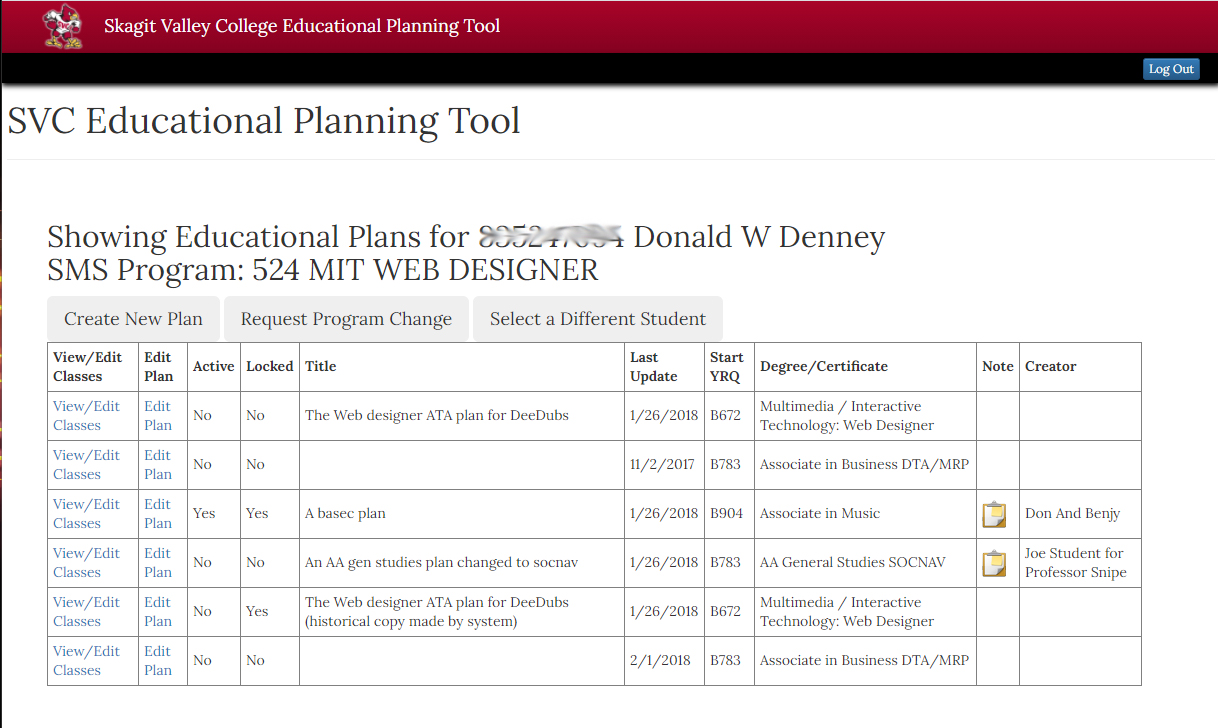
Faculty and students needed a way to plan out the degree path of a student. The faculty and counselors needed to be able to track the student’s progress over the time they are attending SVC.
My role in this project was to create a responsive modern view to allow the faculty or student to create a “Degree Plan” using live data from our catalog of classes and student records.
Integrated student and class data from legacy systems using a custom built api to convert the data between modern display style and the legacy storage style.
Needed to overcome obstacles related to the formatting of the legacy data such as converting dates and times into human readable text. Also creating conversion algorithms to deal with displaying legible content instead of the codes that the data is stored in.
allow the faculty counselor and mentors to track the student progress over the life of the plan.
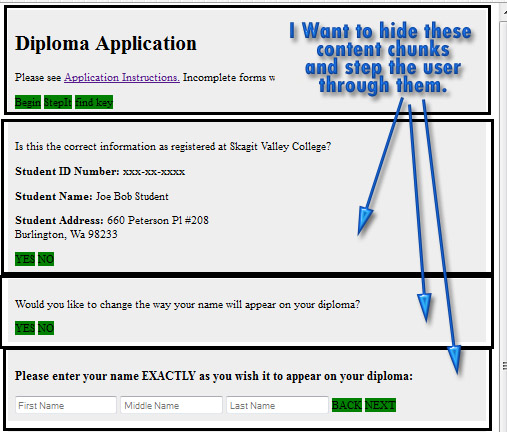
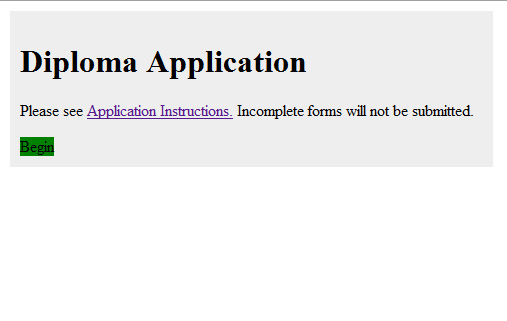
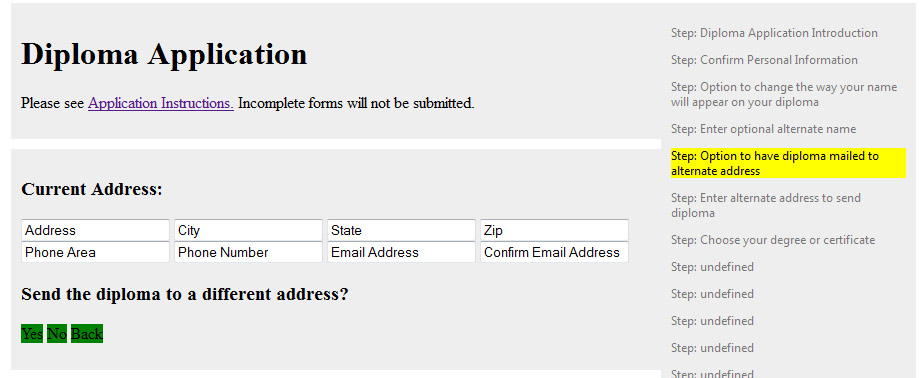
I was working on a way to break up page content and display it in user friendly chunks. Very similar to the Jquery Form Wizard plugin, but hopefully a lot easier to use. After years of making forms into applications, I have come up with an algorithm to plug into any form or content that will transform it into a paperless web application with the following features:
To a developers point of view the best thing is Automation!
Content organized and displayed to the user in an easy to navigate style.
Client side validation for form elements when and where needed.
Form summary and easy ability to make changes before submit.
Takes care of form data submission using Ajax to hand the data on a silver platter to any api.
Here are the notes to myself while developing.
Hiding and Displaying content
The first decision is how to break up the content chunks. Well, a div with an id of “step_xxx” seems like a good idea. XXX should be a detailed way to identify the content such as “step_intro” “step_personal_info”. I will put these divs on the page in the correct order that they would be accessed, with the exception of where the paths branch off.
So now I have my content set up in chunks that I can select and identify using JavaScript. I am going to use JQuery because of it’s powerful selection abilities. One little bit of code gives me the selection I need…
$('div[id^="step_"]').hide(); // select and hide all divs with id containing "step_" in the id.
Well this is a good start, but now I need to determine how many steps are in my display, create an index or table of contents, and then step the user through them as needed.
Creating a table of contents
My initial selector from above gives me the power to do more than just show/hide the elements that are selected. By turning this selection into a list, I can come up with a table of contents for my users to know exactly what kind of huge form they are about to fill out. Give them a chance to chicken out :)
I have created a function to list this table of contents:
function createTableofContents(){
for(i=0;i<totalsteps;i++){
$("#step_intro").append("<p>Step:"+thesteps[i].id+" || Find a way to put the contents of the first child element here as description text</p>");
}
}
But its rough. We need to put the toc into a container styled to display in a sidebar list view. Lets check the dom for the existence of id tableofcontents, create it if its not there, then append the steps array. This would allow to drop into any form, yet give advanced users the ability to make a custom view to display the toc.
Now I need a way to give these steps a description that would mean something to the user, since they probably don’t care about “step_step1a”. Referring to my previous post on using custom attributes, I feel like this would be a good place to use them. I don’t want to put it as a title , because the elements inside the div will need to have their own titles. I am going to give each step an attribute of stepdesc and assign it a value that would be a good description of the step.
Now when the page loads, the huge amount of content is hidden , and the user is presented with a wizard to guide them through the steps, and even a table of contents so they know where they are in the wizard.
Moving through the wizard steps
I need to look for existing elements named : “stepDownButton” and “stepUpButton” . If they are not there, then create them. If they are there, then leave it alone. This will allow for a button to be put in place where user needs a branch off the linear path. If the content is on a linear path, the plug in will create all the buttons to step through the content. In the first step, make a special button to “begin”. in the second to last step make the “next” button into a “submit” button instead.
*** is it possible to add the abilty to hit enter and have it click the next button.? lets try it soon.
Validating User Input
Now I need to provide a means of validation for each step that has a required field. I will make a function to call for each step, check whether there is a required element, and validate if needed. I would like to pass this off to the jquyer validaton plugin. Need to work on this though, cause its called a little differently than I had setup for. They add an attribute of required to the element rather than a class. Also having trouble to plug in the validator to my plug in lol.
This works good on the select and the inputs, but radio buttons are always a pain in the ass. Good thing I have my previous post on working with checkboxes and radio buttons to refer to. I don’t want to add the additional code to loop through these, and figure out what value would be required, then have to alter my validator function. I am going to use a hidden text field, make it required, and put the value of the chosen radio button into it. That should enforce validation on choosing a radio button.
******** its working ok, but then there is a duplicate field in the form summary: Commencement Attendance Option : mtvernoncampus<– from the radio button choice. Commencement Attendance Option Choice : mtvernoncampus<– from the hidden text field.
$("input[type='radio'][name='commencementattendanceoption']").on("change", function(){
				alert($( this ).val())
			});
Dynamic fields and validation.
I want to make a reusable code to add a dynamic field with validation. I need to add text box to allow user to attach transcripts.
I will pass the step id into a function to create the dynamic fields in the container. with validation and ability to delete the addl field and its validation.
form summary
A major goal is to provide a solution for the summary and display of user’s data before form submission, so they may go back and correct any errors. In the second to last step, the plugin will set the the “NEXT” button onclick to stepUp(‘submit’); The plugin will add a summary of the data the user entered so they may go back and make any changes. You may choose a custom display of the summary by putting an element with id “formsummaryarea” into this step. The plugin will omit any empty or hidden fields from the summary, and you can put class “nosummary” to omit any other items from the summary.
It seems that i need to modify the summary when it displays the contents of a dropdown element, it needs to display the text rather than the value. For example, the dropdown for choose degree, the values are numeric, and the display is a text string. For the summary, telling the user that they chose document 10 is pointless, they need to confirm the text name of the doc that they chose.