Well, I have come across the need to make sure that a string doesn’t contain any code that would make it a link. For example, I need to allow the user to enter a filename but not have any html code in it.
For this current situation:
<a href=”myfile.html”> is an invalid string.
http://myfile.html is an invalid string.
I want the user to only be able to submit “myfile.html” and then I will handle the linking and referencing using server side code.
[code] function checkurl(){ // function to ensure no a href or quotes get in here.
console.log(“Lets check the url to make sure no a href or quotes”);
var thelink=$(“#slide_external_link”).val();
if(thelink !== “”){ // check for stuff we dont want.
if(thelink.match(/href=”([^”]*”)/g) || /^(f|ht)tps?:///i.test(thelink)){ // this looks like it comments out after i.test, but its workin.
console.log(“Can’t process the request because there is code inside the string. We only want the address of page without anchor code”);
alert(“Please remove any anchor code from the external link. An example of valid entry is: directory.asp_Q_pagenumber_E_520”);
return false; } } } // end check url funk[/code]
Now I can call this function as part of my client side validation upon form submit. I also need to implement a server side catch as well, just in case.
I have come across the need to update a ui view of tabular content to be sorted by numeric order ascending. Javascript has a sort() that can be used for this purpose. I will use jquery for its powerful and easy selection capabilities.
Here is a sample of the tablular data:
Sequence
Filename
Description
Enabled
Delete
0
sliders/test.jpg
Its a slider
True
X
1
sliders/test2.jpg
Its another slider!
True
X
2
my file location
my file description
True
X
When the user changes the sequence, I would like to update the ui view to reflect the changes in the display order.
I have given each row of the table that contains sortable data a class of “sort”
Then I use Jquery to select those rows, and sort them by the number in the sequence column.
function sortthetable(whattable){ var $tbody = $('#'+whattable); $tbody.find('tr.sort').sort(function(a,b){ var tda = $(a).find('td:eq(0)').text(); // can replace 0 with the column you want to sort on var tdb = $(b).find('td:eq(0)').text(); // this will sort on the firstcolumn // if a < b return 1 return tda > tdb ? 1 // else if a > b return -1 : tda < tdb ? -1 // else they are equal - return 0 : 0; }).appendTo($tbody); }
Here are some great techinques that I have come up with while working as paperless applications developer at SVC:
Working with money can require a lot of scripts to ensure sucessful data entry , transfer and saving.
One thing that comes up is the errors that users can make when entering the figures for money into a form. The forms will have many different requirements for entering the monetary information, such as type of figures desired. For example, on one form, I need the user to only enter a whole dollar amount, and I need to make sure that no dollar signs, cent signs or punctuation make it into the calculations for totals.
Here is a script to clean an entry of all dollar signs, cent signs, punctuation and ensure that whole dollar amounts are entered. For this usage, I have set up the function to be passed a Jquery object of a textfield , and the function will get the value, fix it and put it back in.
[code language=”javascript”]
// strip out any $$ .00 and anything else
function stripper(who){
dirtynumber = $( who ).val();
cleannumber = parseInt(dirtynumber.replace(/[^d.]/g, “”));
if(isNaN(cleannumber)){cleannumber=0;}
$( who ).val(cleannumber); }
[/code]
Here is a script to compare two values to make sure they are the same:
[code language=”html”]
// ensure budget items total match budget request
var amount1 = parseInt($(“#fund_request”).val().replace(/[^d.]/g, “”));
var amount2 = parseInt($(“#justification_budget_total”).val().replace(/[^d.]/g, “”));
if(isNaN(amount1)){amount1=0}
if(isNaN(amount2)){amount2=0}
if(amount1 !== amount2){alert(“The total budget request : ” + amount1 + ” doesn’t equal the budget justification item total: ” + amount2 + “. Please check your numbers and re submit.”);return false;}
[/code]
Here are some great resources for getting images to use without copyright issues. NOTE: I firmly believe that if you can’t take the picture or make the graphics, then why the f are you calling yourself a designer, but in a pinch, these are available. If I were to use them in a project, I would make sure to edit them so they are not recognizable as the original free image.
Culinary Team Certified.
For my first step in becoming an award winning chef at The Olive Garden, I undergo intensive hands-on training for 2 weeks prior to the grand opening of the new restaurant in Burlington Washington. After successfully completing this training, I am awarded with the “Culinary Team Certified” pin and a full time position as head chef.
Employee Of The Month.
This was my first award, I was chosen as first culinary team member employee of the month, soon after the restaurant opened. This award is given by the management for stellar performance under fast paced conditions.
Certified Trainer.
I was nominated to enter the certified trainer program by my supervisor, who told me that “I had skill and reliability that was unparalleled in her time at Olive Garden.” I took classes on training procedures, food safety and sanitation standards, and general knowledge of the dishes and recipes. I easily passed all the tests with high scores, and became Certified Trainer for the kitchen, responsible for training new hires to the high standards of quality and service expected by my supervisors.
Pace Setting Award.
This award is gained by obtaining the highest scores in the entire region in every category including food quality, customer satisfaction, corporate “Total Quality” inspections, State Health Department inspections.
P-Pace: Personalizing the dining experience by understanding the guest’s time expectations (are they in a hurry, are they meeting friends and taking time to catch up, etc…) A- Attentiveness: Building connections with our guests, being attentive to their needs and making them feel comfortable. Smile, be friendly, approachable and laid back. C-Caring: Have a spirit of warmth and generosity that shows through my actions. BE KIND…. always look for an opportunity to show kindness ESPECIALLY in a situation with a dis-satisfied guest. E- Excellence. Set High expectations and not just meet them but exceed them. Deliver on those Goals 100%!
Forbes 100 best companies.
Proud to be part of the team that has earned the award to be one of the 100 best places to work.
Primo Chef Award.
I am very proud of this award because I was chosen by my peers. My fellow co workers nominated me for this award due to my stellar performance, outstanding food quality, speed and my great work attitude.
Service Team Certified.
This is awarded for completing front of house training. I didn’t feel complete with only back of the house skills, I decided to round out my training by learning how to provide outstanding service to customers.
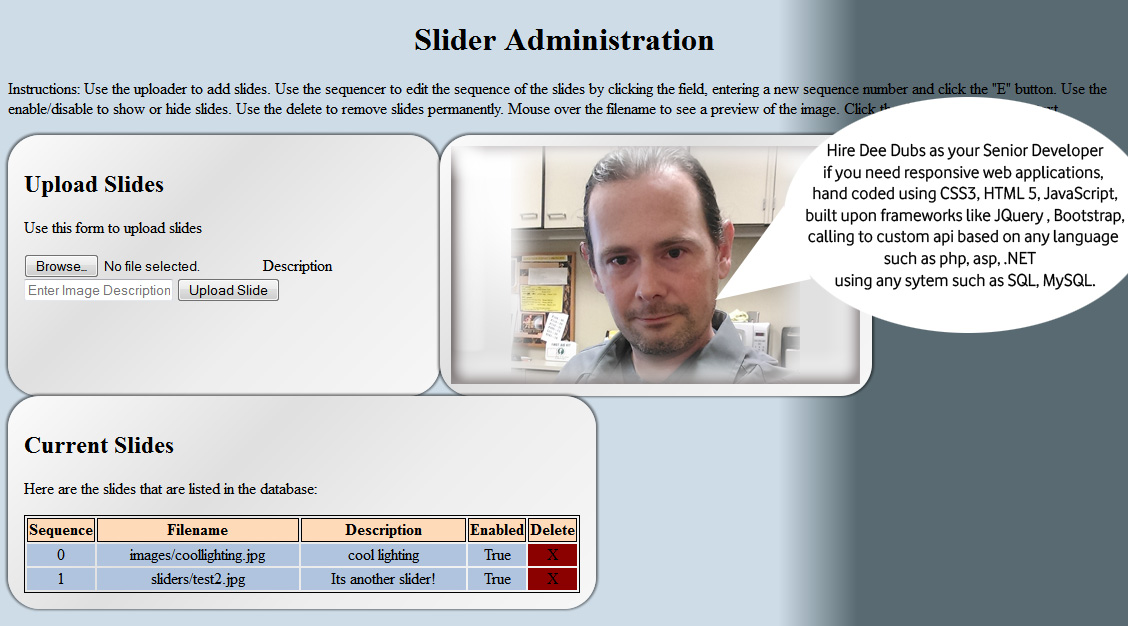
Due to my years of experience designing custom content management systems, I have been tasked with creating a plug in to the CMS at Skagit Valley College that will allow staff to administer their respective home page image sliders via a web based admin control panel. Features include list of slides, ability to upload new slides, delete slides, arrange the sequence of the slides, and control the display of the slides. The slides are live at www.skagit.edu
The users will also have the ability to administer home page banners. Features include list of banners, ability to upload new banners, assign banner to homepage, delete banners.
The purpose of this project is to reduce webmaster workload by allowing staff to admin their respective home page sliders and banners. I will be taking on the role of Senior Developer for this project, and will perform the duties of all roles including : Information Architect, User Experience Designer, User Interface Designer, Web Application Developer, SQL Database Administration.
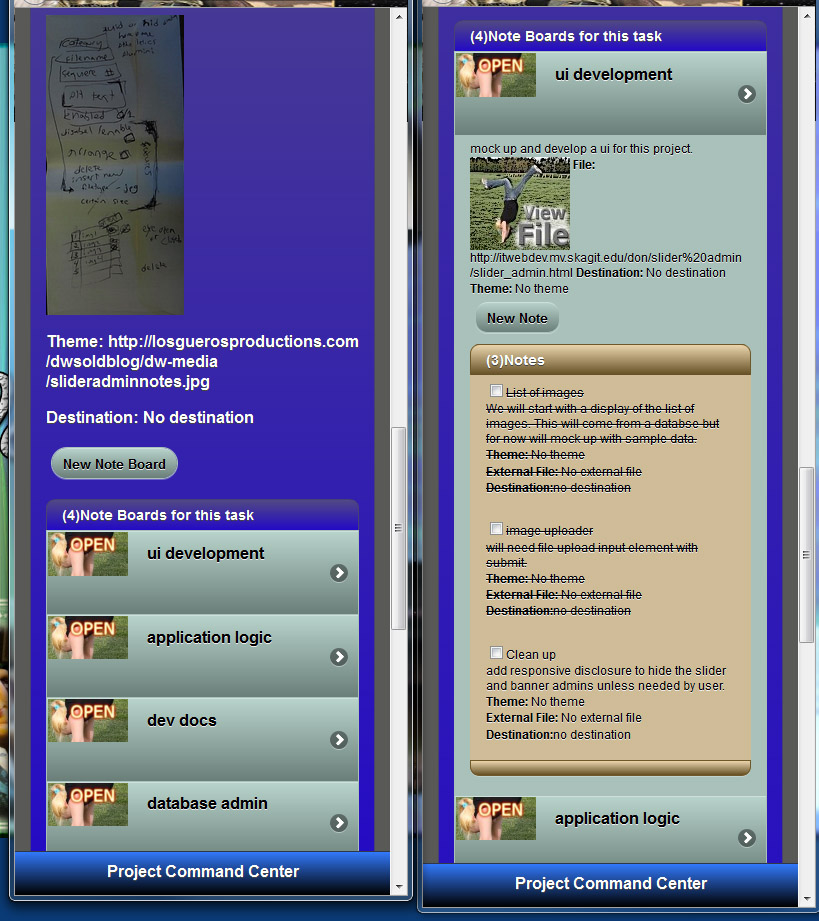
I begin with the I/A documentation, the key to every successful project. After creating the Creative Brief, and clearly stating the objectives, purpose, target audience and timeline for the project, I then create the Flowcharts, Wireframes and User Stories.
With all the proper documentation in place, I have a clear project scope and will begin the design, develop and deployment by using my project management cloud.
From the screenshot you can see the hand written notes from meeting with the client, and the task lists that I created for the project. Each task list is filled with the tasks that I need to get done, and notes about each topic. It really helps keep me on track and manage the progress for the project.
I am going to develop an object oriented api for this project, with the application programming interface expressed in javascript and vbscript.
The api to handle the upload of slides will be interesting, since there isn’t a build in method for capturing the form upload data. We are using a third party library to handle the upload, and I haven’t even seen it yet.
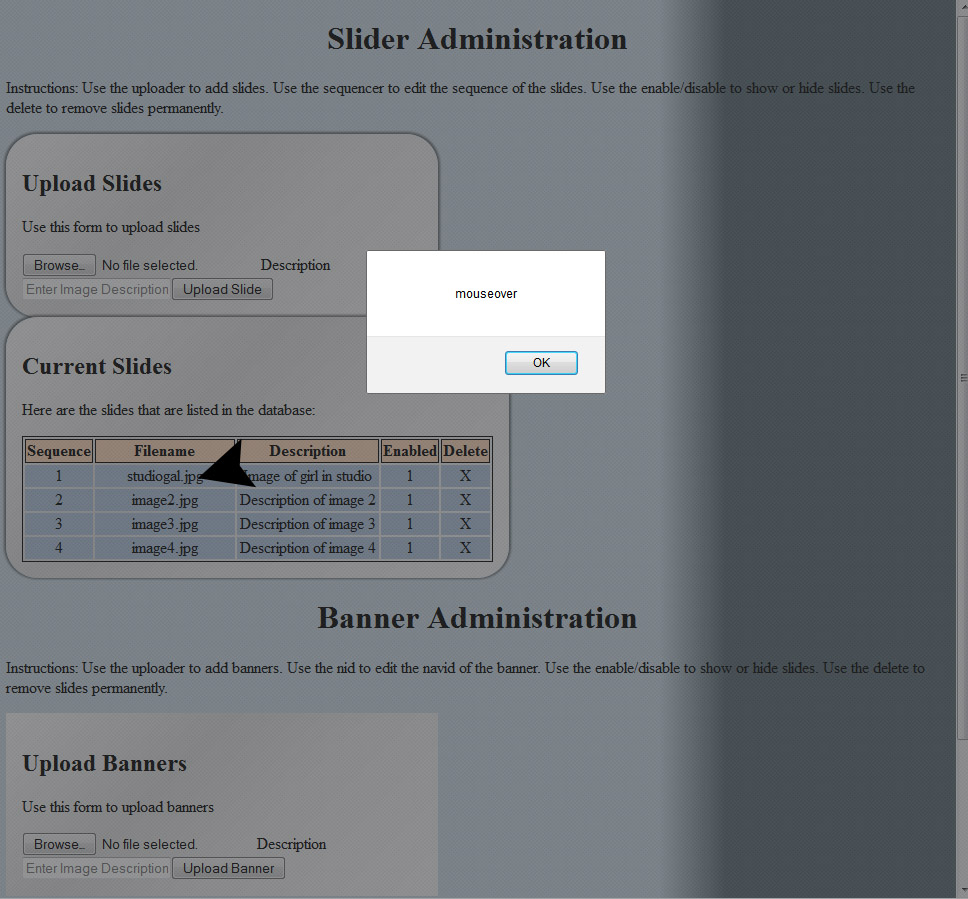
I have the list of slides layout in a table, since its the perfect use of tablular data. The list is generated dynamically and injected into the dom via a call to the api. This has the effect of negating my events that I place on the image to have a mouseover thumbnail preview. I need to use the doc delegate that I deved into in a previous article.
Im going to delegate the event to my slides layout table, and then apply it to any td element with the class of “previewzone”. So lets slap it on there and see if it works…
Creating secure passwords can be pretty lame. Most sites have different requirements such as number of characters, the need to include special characters, capital letters, and numbers. I have found some great resources for creating passwords generated to specifications such as number of characters, special characters and other requirements.
There are some things that should not be handled with responsive design. For example I’m creating bonus content for devices with very large screens. Using responsive design, the common technique is to load this bonus content into the dom but not show it for certain size screens. However this still takes its toll on the load time and would impact performance of the device since it would still have the content in its memory.
For the bonus content, I am going to display a large graphic image only on devices that meet a certain height and width requirement. This can be easily accomplished without a third party plug in or framework using standard JavaScript.
Content on Samsung Galaxy Mobile Phone
The JavaScript behind this is surprisingly simple and cross browser compatible. I have tested successfully on PC’s with new ie and firefox, surface pro, android 2.2 up, ipad, iphone, blackberry playbook, older imac with safari.
var screenheight=screen.height;
var screenwidth=screen.width;
if(screenwidth>=1280 && screenheight >= 1000){
// execute my sweet js script to display bonus content.
}
One of the great things about TTD is the ability to track the success of each action in the application, whether it was user initiated or an automatic application function. For me, so far, one of the best ways to do this is using the debug console built into the browser. Each browser is specific, of course, but there is a simple technique to use the code cross browser without generating errors.
An example of usage is in my form content wizard plugin.
  // look into step for custom button, then add the "begin" button to the first step if not there.
 if(!beginbuttonclass){
var beginbuttonclass="";
console.log('Note from content display wizard plugin: beginbuttonclass has not been defined. See documentation for more information.');}
To see if an external script is loaded sucessfully, you need to have a variable that the script would provide, then check for it. For example here we will try see if I have successfully loaded JQuery from the cdn: (code.jquery.com/jquery-1.10.2.min.js)
try {
     if($()){console.log("Message from slider admin: Jquery loaded... now executing document load functions...");}
} catch (e) { console.log("Message from slider admin, error loading jquery..."+e.message); }


")
