Here is the 3dw tools XHTML Template.
Working with date and time in ASP VBScript
Here is a sweet way to perform a function based on the date.
If DateDiff(“n”,Now(),”9/15/13 08:00:00″) <= 0 Then
openorclosed = “open” ‘open form to public access.
Else
openorclosed = “closed” ‘close form to public access.
End If
Lets break down the use of the DateDiff function. From the msdn docs I see DateDiff(interval, date1, date2 [,firstdayofweek[, firstweekofyear]])
Interval lets us decide how precise we want this function to be. If we want, we can call it as broad as a year or down to the second we want to define.
For example, since its December and all the kids are freaking out, lets make a Christmas countdown timer to show how many days until Christmas.
today = Now()
christmas = “12/25/2013”
interval = “d” ‘ we use d since we want to count the days.
numberofdays = DateDiff(interval, today, christmas)
Response.Write(“<p>There are only ” & numberofdays & ” days until Christmas.<p>”)

To really automate the open and closing of a form, I need to see if the date is in the range of open and closed dates provided by administration.
opendate = “July 1, 2015″
closedate=”April 20, 2015”
If CDate(NOW()) > opendate and CDate(NOW()) < closedate Then
response.write(“<p>the form should be open</p>”)
Else
response.write(“<p>the form should be closed</p>”)
End If
How about if I want to format a date to look good for the user. In some cases we would want the date to look formal: Lets take Christmas:
christmas_date=”12/25/2015 24:00:00″
FormatDateTime(open_date, 1) // this would output “Wednesday, December 25th, 2015”
FormatDateTime(open_date, 3) // This would output “12:00 AM”
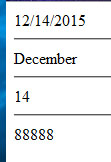
Response.write(date & “<hr>”)
Response.Write(MonthName(Month(Date)) & “<hr />”)
Response.Write(Day(Date) & “<hr>”)
Response.Write(Month(“8/10/2008”))
Response.Write(Month(“Aug 10, 2008”))
Response.Write(Month(“10 Aug, 2008”))
Response.Write(Month(“10 August, 2008”))
Response.Write(Month(“August 10, 2008”))
Response.Write(“<br />”)
CSS Transformation Matrix Examples
I know that the specs are still experimental, but the support for CSS 3 transformations has reached to all of the major browsers, with millions of combined users accessing the web through them.
The basic transformation matrix function is transform: matrix();
You use this in a style declaration as so…
#mydiv{ transform: matrix(1, 0, 0, 1, 10, 10); }
This would position the div as if you used left:10 px; top:10px; but it is way more awesome than that.
Here is a css gradients playground.
Technical Instructions: How to use my Form Content Display Wizard
So, to use my plugin to any form or content,
Separate content chunks:
Wrap the content in div containers with unique ids begining with “step_xxx” where xxx should be a detailed way to identify the content such as “step_intro” and “step_personal_info”
If the path is non branching, the plugin will create buttons for “back” and “next” named “stepDownButton” and “stepUpButton” . It will look for the second to last step and put a submit, and the last step is the confirmation. To create a custom path, branch, or skip a step, just create a button named “stepDownButton” and “stepUpButton” . Give the button an onclick of stepUp(‘stepname’) or stepDown(‘stepname’) to make the button skip to a certain step.
Table of contents
The plugin will use the first element inside the step as description for the table of contents. You can use the attribute stepdesc on the step_xxx element as a custom title for the toc. The toc will be appended to the first step unless you make a custom toc using a container with id of “tableofcontents”. This can be disabled by …..
Form elements and Validation
To provide “empty field” validation to form elements in a step, just add the class “required” to the element. Place the class “email” to validate an email address on one input element. You can add class “match” to two elements in a step and they will have to match each other. Give the elements a unique ID and a good name attribute, and the plugin will create placeholders for the text input elements from the name.
NOTE: it seems like the name attribute is the perfect place to put a readable descriptive title that could be used in creating the labels, and for summary display. NOTE: it seems like moving to the new html5 text inputs for validation such as email tel, then if input type = email, wouldn’t need a class selector.Just a thought for moving forward with
Data summary
In the second to last step, the plugin will set the the “NEXT” button onclick to stepUp(‘submit’); The plugin will add a summary of the data the user entered so they may go back and make any changes. You may choose a custom display of the summary by putting an element with id “formsummaryarea” into this step. The plugin will omit any empty or hidden fields from the summary, and you can put class “nosummary” to omit any other items from the summary.
Submit and final confirm
In the final step, you should place your final confirmation text there. This will tell the user the results of their data submit, success or error. When user is ready, the script will submit the form data, and move to the final confirmation.
Themeing the elements
To theme the elements, just add classes to items in the ui view using jquery :
This will add a Panel effect to the divs—
$(‘div[id^=”step_”]’).addClass(“softblackgradient blackbottomrightboxshadow mediumallaroundpadding”);
The buttons wont work to style this way cause they aren’t in dom yet. To theme the buttons, you need to set these global variables before you call to include the plugin.:
I feel that the “Begin” button should look very different from the Next and Back buttons:
beginbuttonclass = “button roundedcorners success mediumallaroundpadding”
Here is to style the step up and step down buttons:
stepupbuttonclass=”button oval success smallallaroundpadding”
stepdownbuttonclass=”button oval alert smallallaroundpadding”
The “Submit” button needs to also look very different from the step up and down buttons.
style it like this: submitbuttonclass=”button roundedcorners mediumallaroundpadding success”
If you have put in custom buttons to go to non linear paths, make sure to still give the the names of stepUpButton and stepDownButton. Then you can select and style them as well using the jquery selector.
Theres tableofcontents to layout the toc, and highlightstep to control the highlighted step. This is proving very difficult to get out of the plugin, since the toc relies on the scripts. There are classes yellowhighlight, and mediumtext that will need to be declared in the ui view that is using the plugin.
Filter text before it is displayed. Find and replace invalid charaters from cms content using JavaScript and ASP
The content for the website is generated by the staff and put into the site using the content management system. Much of this content is created in a Word Processing program such as Microsoft Word. In many cases, the content is not formatted correctly for the web. While the cms does a good job of filtering out the Word Document markup, there are still some charaters that get through the filter, but don’t display properly on the web. These characters show up as odd symbols such as diamonds and squares. I have created a filter to run the content through before it is displayed, finding the invalid characters and replacing them with html character codes.

Due to the restraints of the system I am working in, I decided to go with a vbscript dictionary object to hold an array of characters that were not displaying properly in the browser. I created an api that could be included into any page, and used an algorithm to detect and replace the pesky invalid characters.
‘——————————
‘_____________________________
‘ function to replace extended asci chars with the html equivalent ‘***************************
Function replace_characters(inString)
newstring = inString
dim lamechars
Set lamechars = CreateObject _
(“Scripting.Dictionary”)
lamechars.Add “–”, “–”
lamechars.Add “®”, “®”
lamechars.Add “’”, “’”
lamechars.Add ““”, ““”
lamechars.Add “””, “””
lamechars.Add “—”, “–”
For Each character in lamechars
newstring=Replace(newstring, character, lamechars(character))
Next
Response.Write(newstring)
End Function
‘**************************
‘ end function to replace extended asci chars with the html equivalent ‘—————————
Equalize JQuery Mobile Grid Height
function resize(){
var tallest = 0;
$(‘.ui-grid-b > div’).each(function(){
temptall=$(this).attr(“height”);
if (temptall >= tallest){ tallest=temptall;}
});
; $(‘.ui-grid-b .ui-bar’).height(tallest);
}
$(“body”).on(“resize”, resize(););
Three column css layout
http://www.w3.org/2002/03/csslayout-howto
A great documentation.
JQuery Mobile Single Page Template
This is the standard page template you should start with on a project:
<!DOCTYPE html> <html> <head> <title>Page Title</title> <meta name="viewport" content="width=device-width, initial-scale=1"> <link rel="stylesheet" href="http://code.jquery.com/mobile/1.0/jquery.mobile-1.0.min.css" /> <-----this will need to be updated to the latest cdn link<script type="text/javascript" src="http://code.jquery.com/jquery-1.6.4.min.js"></script> <-----this will need to be updated to the latest cdn link<script type="text/javascript" src="http://code.jquery.com/mobile/1.0/jquery.mobile-1.0.min.js"></script> <-----this will need to be updated to the latest cdn link</head> <body> <div data-role="page"> <div data-role="header"> <h1>Page Title</h1> </div> <!-- /header --> <div data-role="content"> <p>Page content goes here.</p> </div> <!-- /content --> <div data-role="footer"> <h4>Page Footer</h4> </div> <!-- /footer --></div> <!-- /page --> </body> </html> Alt Key Codes
Looking at the PHP Form Post Object
I use php to talk with MySQL db server. It comes in handy for making apps. Here are the code variations for receiving POST variables from a client request and ,for debug, a quick list of the variables, names and values. Using this: print_r($_POST); this gives a breakdown of the array holding the data from the post variables…. Array ( [signindate] => 11/4/2011 [signintime] => 15:33 PM [nameofchild] => dev en [parentsignature] => don e [in] => Sign In ) to access an element of the array I use a couple methods.. to get them one by one by name so I can put them into the database.. $myformelement=$_POST[‘form element field html id name’];
Now that the records are correctly inserting into database, my next step is to use some ajax to call the php behind the scenes while leaving my webapp ui view intact.
- Check if a person is selected
- Create an XMLHttpRequest object
- Create the function to be executed when the server response is ready
- Send the request off to a file on the server